For many churches, the ATEM Mini has become the heart of the livestream setup — not because it’s flashy or complicated, but because it gives small teams and Sunday-morning volunteers a simple way to create a clean, reliable broadcast. Still, when you first unbox it and stare at the buttons, cables, and HDMI or SDI ports, it’s easy to wonder whether you bought the right equipment or how everything is supposed to fit together.
This ATEM Mini Church Setup Guide was written with real churches in mind — the ones where the “tech team” might be two volunteers, a pastor, or a faithful teenager who runs the livestream each week. You don’t need a background in video production to follow this. You just need to know what plugs into what, how to get clear audio, and how to feel confident hitting “Go Live” on Sunday.
We’ll walk through the entire setup step-by-step, from choosing the right ATEM Mini model to connecting cameras, preparing slides, setting up audio from your soundboard, and fixing the common issues that almost every church experiences at some point. By the end, you’ll understand not only how to set up your system, but why certain settings and connections matter — all explained in a friendly, practical way.
Let’s get your church’s livestream running smoothly, without the stress.
Table of Contents
Step 1 — Choose the Right ATEM Mini for Your Church
Before any cables get plugged in, before cameras get mounted, and before anyone presses a button, the very first step is making sure your church is using the right ATEM Mini model for your needs. This doesn’t mean buying the biggest or most expensive version — it simply means choosing the one that fits the way your church worships, the size of your room, and how your volunteers serve each Sunday.
The good news is that the ATEM Mini line is very forgiving. Every model can help you create a clean, reliable livestream. The differences really come down to how many cameras you use, whether you want to record all your angles separately, and how much you expect your livestream to grow over the next couple of years.
Mini, Mini Pro, Pro ISO, or Extreme? Here’s the simple way to pick.
ATEM Mini Pro — Best for most small to mid-sized churches
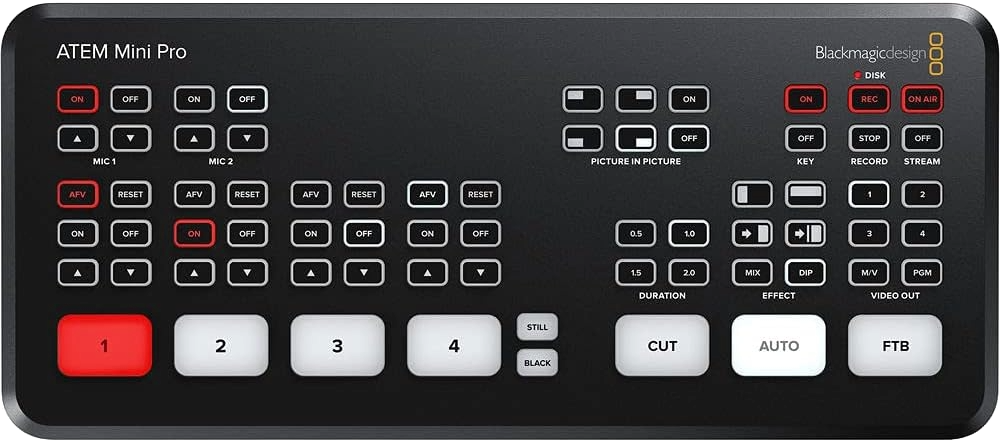
If your church uses one or two cameras (maybe a wide shot and a pastor shot), and you also bring in slides from a laptop, the Mini Pro hits the sweet spot. It adds reliable streaming, better monitoring, and a more “Sunday-friendly” workflow than the base model.
ATEM Mini Pro ISO — Best for churches that want to edit afterwards

The ISO version does everything the Mini Pro does, plus it records each camera angle separately. This is great for churches that post polished sermon clips later in the week or re-edit messages for social media.
ATEM Mini Extreme / Extreme ISO — Best for growing churches

If you want 3–6 cameras, a lyrics computer, a dedicated sermon notes computer, or you plan to expand your production team, the Extreme gives you eight inputs and more room to grow. Many churches upgrade to this later, so if you have the budget, it’s a strong long-term choice.
Is HDMI right for your church, or do you need SDI?
Most churches start with HDMI because:
- It’s affordable
- It’s simple
- Many beginner cameras already use HDMI
However, if your cameras are more than 50–75 feet away from the switcher — which happens often in larger sanctuaries — HDMI becomes unreliable unless you use extenders or converters.
That’s when SDI gear (and SDI-based ATEM models) becomes very attractive. SDI cables lock in securely, travel long distances, and don’t loosen if someone bumps a stand or steps on a cable.
You don’t need SDI to start. But it’s good to know when you may eventually want it.
See more about the different ATEM models on our posts below:
- The Ultimate ATEM HDMI Comparison: Mini Pro vs Pro ISO vs Extreme
- The Ultimate ATEM SDI Comparison: Mini Pro vs Pro ISO vs Extreme
- Best Entry-Level Video Switchers for Churches (Blackmagic ATEM vs Roland V-1SDI)
- How to Connect a PTZ Camera to an ATEM Mini Using SDI Converters
Once you’ve chosen the ATEM model that fits your church, the next step is planning your layout — where the cameras go, how your slides computer connects, and how to keep your wiring clean and volunteer-friendly. That’s exactly what we’ll walk through in the next section.
Step 2 — Plan Your System Layout
Once you know which ATEM Mini model your church will be using, the next step is to map out your physical setup. This part is especially important in churches because no two sanctuaries are shaped the same, and your camera placement, cable runs, and equipment table all affect how smooth your livestream will be on Sunday morning. A little planning here saves a lot of stress later.
Many churches start with a simple 2-camera layout:
- Camera 1: A wide shot of the stage or platform
- Camera 2: A tighter shot on the pastor or worship leader
If you have a third input, it’s usually the lyrics or sermon slides computer, which the ATEM Mini handles easily through HDMI. The key is placing everything where volunteers feel confident operating it and where cables don’t become tripping hazards or get unplugged by accident.
Where to Put Your Cameras
Try to place your main camera in the center aisle or on a tripod at the back of the room. If that isn’t possible, pick a place where you can see the stage clearly without people constantly walking in front of the shot. Your pastor shot should be slightly zoomed in, ideally from a side angle or from a raised position if you have a balcony.
If you’re using a PTZ camera, mount it where it has an unobstructed view of the platform and where volunteers can easily control it from your livestream station. These cameras often pair well with the ATEM Mini when used through HDMI or via an SDI converter if you’re running longer cables.
Where Your ATEM Mini and Volunteers Should Sit
Set up your livestream station where your volunteers can see both the sanctuary and their multiview screen. Many churches place the ATEM Mini in:
- The back tech booth
- A side media table
- A portable AV station tucked against a wall
Make sure there’s room to run HDMI or SDI cables cleanly into the switcher without creating tangled bundles that confuse future volunteers.
Plan Your Cable Paths (HDMI, SDI, or Extenders)
HDMI works great when cameras are close to the ATEM Mini, but it struggles over long distances. If any cable run starts getting beyond 50–75 feet, you may want to explore:
- HDMI extenders (Ethernet-based)
- Active HDMI cables
- SDI converters, which give you long, reliable cable runs
Learn more about these options in these posts:
- How to Extend Your HDMI Signal With Extenders for Church AV Systems
- What is the best SDI-to-HDMI Converter?
Deciding How Many Inputs You’ll Need Weekly
Even if your church only uses two cameras today, think ahead. If you plan on adding:
- A dedicated sermon notes computer
- A countdown timer feed
- A third camera for close-up worship shots
…then it’s helpful to leave room on your ATEM Mini for future inputs. This is why many churches start with the Mini Pro or Extreme — not because they need every feature, but because a little flexibility goes a long way.
Once your layout is planned and you know where everything will sit, you’re ready to start physically connecting your cameras, computers, and displays. Step 3 will walk you through how to wire everything cleanly so your volunteers feel confident each Sunday.
Step 3 — Connect Cameras, Cables, and Outputs
Once your layout is planned, Step 3 is where everything becomes real — this is the hands-on part where your system physically comes together. The goal here isn’t to make the wiring look perfect (though that helps), but to make sure each device sends the right signal to the ATEM Mini so your volunteers can switch between sources without confusion.
This step focuses entirely on what to plug in, how to plug it in, and how to avoid common wiring mistakes.
Connect Each Camera to the ATEM Mini
Start by connecting your cameras to the ATEM Mini using HDMI cables. Each input is clearly labeled (1, 2, 3, 4), and it doesn’t matter which order you choose — as long as you know which camera is which.
A few important tips make this go smoothly:
- Use HDMI cables that fit your distance, not the longest cable you own
- Check that your camera’s HDMI output is “clean”, so on-screen icons aren’t sent to the livestream
- Label each cable and camera matching the input number (“Cam 1,” “Cam 2,” etc.)
If you switch to that input and see “No Signal,” don’t worry — this usually means the camera is outputting at a resolution or frame rate the ATEM doesn’t recognize. We fix that later in troubleshooting.
Connect Your Slides / Lyrics Computer
Your presentation computer will likely be connected to Input 3 or 4. To keep this trouble-free on Sundays:
- Set your computer’s external display (the projector/ATEM output) to 1080p.
- Make sure the presentation software is sending a full-screen output.
- Plug the HDMI cable from the computer to the ATEM Mini.
If the screen appears black or cropped, the computer’s resolution or display mode is the culprit — not the ATEM. Adjusting it to 1080p almost always fixes it.
Connect the HDMI Program Output
The HDMI output on the ATEM Mini sends your final mixed video anywhere you want it to go. Most churches use it for:
- A pastor confidence monitor
- A TV near the livestream table
- A lobby display
- A projector (if it matches the ATEM’s resolution)
When you plug this in, the screen should immediately show what the ATEM is outputting. If it doesn’t, it’s likely a resolution match issue, which we’ll address later.
Organize Your Wiring for Volunteers
Once everything is connected, spend five minutes making the wiring easy for your team. The ATEM Mini thrives in environments where volunteers aren’t intimidated by the setup.
A few simple habits help tremendously:
- Use Velcro straps or small cable clips instead of tape
- Keep HDMI cables away from power cables when possible
- Label both ends of every cable
- Tape a small diagram to the table showing which input is which device
This turns your ATEM station into something anyone can walk up to and understand.
With all your cameras, computers, and displays connected, the next step is setting everything up inside ATEM Software Control. This is where your audio, input names, transitions, and presets come together to make the entire system feel organized and easy to run.
Step 4 — Install and Set Up ATEM Software Control
Once everything is physically connected, the next step is installing ATEM Software Control. This software is what gives your volunteers a clear view of everything happening on the switcher. Even if they prefer pressing the physical buttons on the ATEM Mini, the software is where your labeling, audio monitoring, presets, and overall organization come together. It turns the ATEM Mini from a simple box of buttons into a fully manageable, volunteer-friendly production tool.
Download ATEM Software Control
Blackmagic offers the software as a free download on their website. The installer includes everything the ATEM Mini needs to communicate with your computer. The download page can be a little overwhelming the first time, so if your volunteers need extra help, you can point them to a step-by-step guide your site already has.
For a detailed walkthrough with screenshots, see our post:
Now, the basic process looks like this:
- Download the ATEM Switchers software bundle from Blackmagic’s Support page.
- Run the installer and choose ATEM Software Control when prompted.
- Connect the ATEM Mini to your computer via USB-C or ensure both the ATEM and the computer are on the same network.
- Open the software — it will automatically search for your switcher.
If the software doesn’t detect the ATEM right away, it’s usually a connection issue, not a software failure. Reconnecting the USB-C cable or checking your network typically solves it.
Label Your Inputs for Volunteers
Inside the software, go to the input labeling section and rename each input so volunteers instantly know what they’re switching:
- “Camera 1 – Wide”
- “Camera 2 – Pastor”
- “Slides Computer”
This small step removes guesswork and makes Sunday morning smooth for everyone.
Set Your Video Standard
Go to the Settings panel and select the video format your church uses — typically 1080p30 or 1080p60. This ensures:
- Cameras match the ATEM
- Your slides computer looks crisp
- Your livestream encoder stays stable
Once this is set, you rarely need to change it.
Check Audio Levels Using Fairlight
In the Audio tab, the Fairlight tools let volunteers:
- Raise or lower your main audio feed
- Mute unused sources
- Ensure nothing is peaking into distortion
- Confirm the ATEM is receiving audio through visible meters
Visual feedback like this is incredibly reassuring for first-time volunteers.
Save a “Sunday Morning” Preset
Once inputs are labeled, audio is balanced, and your video format is set, save everything as a preset. This gives your team a one-click reset point every week in case settings are accidentally changed.
Most churches label it something like:
“Sunday Service – Default Setup”
With your ATEM Mini now organized inside the software, the next step is making sure your cameras look great. Step 5 will walk you through basic camera settings, matching color across different cameras, and getting a clean image even in challenging sanctuary lighting.
Step 5 — Dial In Camera Settings and Image Quality
One of the most encouraging parts of setting up a church livestream is that you don’t need to be a camera expert to get a good-looking video. Most modern cameras do an excellent job when the right basic settings are in place — and in many cases, leaving things on auto is not only acceptable, it’s actually the best choice for small volunteer teams.
This section isn’t about teaching photography. It’s about helping your volunteers get a clean, stable picture without having to scroll through confusing menus or learn advanced exposure techniques. If your church prefers “set it and forget it,” you’re in the right place.
Start Simple: Let the Camera Do the Hard Work
Most churches run their cameras in conditions that change slightly throughout the service — brighter during worship, a little dimmer during the sermon, colorful lights during songs, and maybe sunlight filtering in through windows. Auto settings help handle these changes smoothly.
Here’s what can safely be left on auto for most cameras:
- Auto Exposure (AE): Balances brightness for you.
- Auto ISO or Gain: Helps the camera brighten or darken as needed.
- Auto Focus: Especially helpful for pastors who move around.
- Auto White Balance: Usually good enough for consistent, indoor lighting.
For churches with small teams, these auto settings relieve stress and reduce the chance of something going wrong mid-service.
When to Take a Moment to Adjust White Balance
Auto white balance works in many sanctuaries, but sometimes the lighting can be very warm or very cool, especially with LED stage lights. If the colors look inconsistent between your cameras, you don’t need to go manual — you can often just choose a preset:
- “Indoor”
- “Tungsten”
- “Fluorescent”
- “Daylight”
These options give your cameras a better starting point while still keeping things simple. Your volunteers won’t have to measure color temperatures or adjust anything complicated.
Match the Frame Rate and Resolution to the ATEM Mini
This is the one area that does matter for compatibility, but the good news is that you set it once and never worry again.
Inside your camera’s menu, just make sure the resolution matches the format you chose in Step 4 (usually 1080p30 or whatever the ATEM is set to). Once that’s matched, you can leave all your creative settings on automatic.
This prevents the dreaded “No Signal” or flickering feed.
Check Your Shots Before Each Service
You don’t need a full checklist — just a quick glance:
- Is the image bright enough to see the pastor?
- Are faces visible and not washed out?
- Are colors similar across all cameras?
- Is autofocus staying on the subject?
If something looks off, most of the time simply switching the camera to a different preset (Indoor, Daylight, Auto) fixes it.
Helping Volunteers Feel Confident
When volunteers know that the camera is handling exposure, focus, and brightness automatically, they can focus on what really matters:
- Framing the pastor nicely
- Keeping shots steady
- Switching smoothly between angles
That’s the heart of a good church livestream — not technical settings, but simple, steady visuals that support worship without distraction.
Optional Resource: For Churches Using PTZ Cameras
If your church is looking to reduce volunteer load or wants easier control over multiple camera angles, PTZ cameras can be a great upgrade — and they work very well with the ATEM Mini when paired through HDMI or SDI converters. They allow one volunteer to operate multiple camera angles from a single controller, making Sundays much smoother.
For a budget-friendly option that many churches find easy to use, see our full review:
This gives your church an overview of what a simple, volunteer-friendly PTZ setup can look like before deciding whether to stick with traditional cameras or move toward motorized control.
With your cameras producing a clean, consistent image, the next step is setting up your audio so your livestream sounds just as good as it looks. Step 6 walks through simple, beginner-friendly audio routing and the easiest way to get a balanced mix into your ATEM Mini.
Step 6 — Set Up Your Audio for Livestreaming
If there’s one part of a church livestream that people notice immediately, it’s the sound. A great-looking video won’t matter if the audio is too quiet, too loud, echoing, or uneven from one moment to the next. The good news is that sending clean, consistent audio to the ATEM Mini doesn’t require complicated settings — just a simple routing approach and a little bit of awareness from your volunteers.
This step focuses entirely on how to get a solid audio feed from your soundboard into the ATEM Mini and how to check levels so your livestream sounds natural and clear.
Send Audio From Your Soundboard’s AUX or Bus Output
Most churches already have a mixer for in-person sound. The easiest and most reliable way to get audio into your livestream is to use an AUX send, Bus output, or Record Out from that soundboard.
This single cable carries everything: microphones, instruments, videos, worship team, and sermon audio.
Here’s the simple approach:
- Choose an AUX/Bus that isn’t being used for monitors.
- Label it clearly: “Livestream Mix.”
- Plug that output into one of the ATEM Mini’s 3.5mm audio inputs.
- In the ATEM Software Control audio tab, set that input to Line (not Mic).
That’s it — you’ll now hear your entire service in your stream.
Use the ATEM’s Audio Panel for Level Control
Once the signal is coming into the ATEM Mini, your volunteers can see the audio meters right in ATEM Software Control. This is incredibly helpful because it gives visual confirmation that audio is coming through properly.
A few guidelines help keep things clean and balanced:
- Aim for yellow, avoid red.
- Mute unused ATEM audio inputs so nothing accidentally bleeds in.
- If levels seem low, adjust the AUX send—not the ATEM’s gain.
- If you hear distortion, lower the AUX or Bus output until peaks stay below the red zone.
The built-in Fairlight tools also let you add light EQ or compression, but for most volunteer teams, basic level control is more than enough.
Avoid Common Livestream Audio Problems
Here are the issues churches run into most often—and the easy fixes:
- No audio at all:
The AUX send is turned down, or the ATEM input is still set to “Mic.” - Echo or double sound:
You’re capturing audio from both the AUX AND the camera microphones.
→ Solution: Mute all camera audio inputs. - Worship sounds great but the sermon is too quiet:
The pastor mic channel is too low in the AUX mix.
→ Bring it up for the livestream only. - Audio too loud in livestream:
Lower the AUX output a little—not individual channels.
These simple habits prevent 90% of livestream audio issues.
Need More Help Fixing ATEM Mini Audio Problems?
If you’re still not getting the sound you expect — or if your volunteers run into buzzing, echo, low audio, or sudden drops in volume — we have a full troubleshooting guide written specifically for church teams using the ATEM Mini:
This article walks through the most common causes of livestream audio problems and gives simple, step-by-step fixes that volunteers can follow without needing any technical background.
Optional Resource: For Churches Choosing or Upgrading Their Mixer
If your church is thinking about replacing an older mixer, moving to digital, or simplifying the livestream workflow, choosing the right soundboard can make your audio setup much more predictable. The ATEM Mini works well with both analog and digital mixers, but each has pros and cons depending on your team and budget.
For a helpful breakdown of beginner-friendly options, see:
This guide compares simple analog boards with more advanced digital consoles and helps churches decide which route is best before upgrading.
With audio flowing cleanly into your ATEM Mini and your levels set correctly, your livestream is almost ready to go live. Step 7 walks you through how to start your stream, test it safely, and monitor everything without stress on Sunday morning.
Step 7 — Going Live and Monitoring Your Stream
Once your cameras, audio, and software are all set up, the final step is actually going live. This can feel intimidating for new volunteers, but the ATEM Mini keeps things simple as long as you follow a clear routine. In this step, we’ll walk through how to start your stream safely, test everything before the service begins, and keep an eye on the health of your broadcast throughout the morning.
The goal isn’t perfection — it’s predictability and confidence.
Option 1: Stream Directly From the ATEM Mini Pro / Pro ISO / Extreme
If your church is using an ATEM Mini model with built-in streaming, this is the simplest and most reliable method. Once your ATEM Software Control is open:
- Go to the Streaming panel.
- Choose your platform (YouTube, Facebook, etc.).
- Paste in your stream key.
- Set your bitrate (usually “Streaming High” is best).
- Click On Air to go live.
This method avoids using a computer encoder and tends to be the most stable option for volunteer teams. Just make sure your livestream computer and the ATEM are hard-wired into the network whenever possible.
Learn more about how to set up your ATEM Mini to stream here:
Option 2: Stream Using a Computer (OBS, StreamYard, Restream)
Some churches prefer using the ATEM Mini as a USB webcam and sending the video feed to a livestreaming platform through a laptop. This gives more flexibility with overlays, remote guests, or additional media.
The two most popular church-friendly platforms are StreamYard and Restream.
Learn more about these options here:
Streaming to Facebook, YouTube, or Both
Every platform handles stream keys and settings slightly differently.
This guide gives volunteers the exact steps for scheduling streams, setting privacy levels, and troubleshooting Facebook-specific issues.
If you stream to YouTube, the process is similar:
- Paste the stream key
- Select a preset
- Run a quick preview
- Then go live with confidence
No advanced technical steps needed.
Check Your Stream Health During the Service
Once you’re live, keep an eye on:
- Your bitrate (stable numbers are good)
- Your audio meters (should be consistently moving)
- Your preview window (no stutter or freezing)
- Comments or chat messages reporting sound/video issues
The ATEM Mini Pro and Extreme models display stream status clearly, which is perfect for less-technical volunteers.
If something drops or stalls, stopping and restarting the stream usually fixes it — especially if your internet momentarily dips.
Optional Resource: Understanding Resolution (1080p vs 4K)
Many churches ask if they can or should stream in 4K. The short answer:
The ATEM Mini line is a 1080p switcher — and that’s exactly what most churches should use.
Learn more about the difference between 4K, UHD, and 1080p here:
At this point, your church is set up, connected, and confidently live. The next step is building a simple, repeatable volunteer workflow so anyone on your team can run the ATEM Mini with ease. Step 8 will walk through creating a smooth Sunday checklist and teaching volunteers the basics of switching.
Step 8 — Create a Volunteer-Friendly Workflow
One of the biggest strengths of the ATEM Mini is that it allows churches of all sizes to run a livestream with just one or two volunteers, even if they aren’t tech-savvy. But the secret to making that possible isn’t the switcher itself — it’s having a simple, predictable workflow that volunteers can follow every Sunday without guessing or stressing.
This step walks you through how to create a smooth routine so your team feels confident, prepared, and supported.
Start With a Simple Sunday Checklist
Volunteers feel more confident when they know exactly what steps to follow. A short checklist posted at your livestream table is often all they need.
A great basic Sunday checklist looks like this:
- Turn on all cameras
- Turn on the ATEM Mini
- Open ATEM Software Control
- Check that each camera appears on the multiview
- Confirm audio levels in the Audio tab
- Switch through each input once to confirm they work
- Test the slides computer
- Load your Sunday preset (saved in Step 4)
- Start your pre-service stream test
- Go live at the scheduled time
This keeps volunteers focused and reduces last-minute panicking.
Teach Volunteers Simple Switching, Not Advanced Techniques
Most churches only need a few basic transitions for Sunday worship. Instead of overwhelming volunteers with features, teach them:
- Cut
- Auto (fade)
- How to switch between Camera 1, Camera 2, and Slides
- How to watch the preview monitor before switching
- How to never switch to an input that shows “No Signal”
This keeps mistakes low and confidence high.
You can save advanced features — picture-in-picture, keying, macros — for later if your team grows.
Run a Quick Pre-Service Test
Nothing builds volunteer confidence like a quick preview before the real stream starts. Ten minutes before service:
- Test your audio
- Switch through your cameras
- Make sure slides are showing correctly
- Press “Start Streaming” (private, unlisted, or test destination)
- Verify audio is clear and synced
Then shut the test down and get ready for the actual service.
This tiny routine avoids most service-time problems.
Keep Instructions Posted at the Livestream Table
Church volunteers rotate, take vacations, and sometimes fill in at the last minute. That’s normal. Keeping clear instructions posted nearby helps everyone stay calm and consistent.
Great things to keep posted:
- The Sunday checklist
- The input labels (“1 = Wide Shot, 2 = Pastor Camera…”)
- Audio “perfect level” screenshots
- Where each HDMI cable goes
- Your emergency troubleshooting tips
Your livestream table becomes a welcoming place rather than a stressful one.
Encourage Simple Communication During the Service
A good volunteer workflow includes simple communication, not pro-level production talk. During the service, volunteers should feel free to say things like:
- “Camera 2 looks a little dark — I’ll switch to 1 for now.”
- “Slides are behind — can you advance one?”
- “Audio looks low — can you check the mixer?”
This keeps things running smoothly without anyone feeling panicked or embarrassed.
Once your volunteers have a clear routine and know what to check each week, the final step is preparing them for the common problems that can appear during a livestream. In Step 9, we’ll walk through the fastest ways to diagnose “No Signal,” missing audio, buffering streams, and display issues — all without needing a tech expert.
Step 9 — Troubleshooting Common ATEM Mini Problems
Even with the best preparation, technical hiccups happen — usually right before the service starts. The good news is that almost every common ATEM Mini issue has a simple, quick fix. And once volunteers learn these patterns, they’ll feel calm and confident even when something unexpected appears on the screen.
This step covers the problems churches run into most often and shows volunteers how to diagnose them in less than a minute.
Problem #1 — “No Signal” on a Camera Input
This is by far the most common issue churches see. Most of the time, it’s not the camera or the ATEM — it’s a resolution mismatch.
Quick fixes:
- Make sure the camera output is set to 1080p (not 4K).
- Check that the HDMI cable is firmly connected.
- Try switching to another input to see if the cable is the issue.
If you’re using SDI converters or long HDMI runs, problems can appear more often.
Problem #2 — Slides Computer Shows a Black Screen
This almost always comes down to the output resolution being set too high or the display mode being incorrect.
Quick fixes:
- Set the computer to 1080p.
- Try “Duplicate Display” or “Extend Display.”
- Restart the slide software after changing the resolution.
Church computers often switch resolutions when plugged into projectors, which can confuse the ATEM.
Problem #3 — No Sound or Distorted Sound
If levels don’t move in the ATEM Software Control meters, or if the audio sounds thin or doubled, it’s usually routing — not equipment failure.
Common fixes:
- Make sure the ATEM input is set to Line, not Mic.
- Mute camera audio so the AUX feed is the only source.
- Raise the AUX send on your soundboard slightly.
- Lower it if the audio is peaking into the red.
See more in our posts here:
- How to Troubleshoot Audio Issues in the ATEM Mini
- No Sound? Quick Fixes for Audio Issues During Church Livestreams or Services
Problem #4 — Projector, TV or ATEM Showing a Blank Screen
Sometimes the ATEM output works everywhere except the projector or lobby TV. That display is usually just picky about the resolution.
Quick fixes:
- Set the ATEM to 1080p30 or 1080p60
- Try another HDMI cable
- If using an extender, restart it
Learn more with these troubleshooting guides:
- No Signal? How to Troubleshoot a Blank Screen on a Church TV or Projector
- Why Does My Blackmagic ATEM Mini Cut to Black When Switching Inputs During Worship?
Problem #5 — Stream Buffering or Dropping Mid-Service
A buffering stream isn’t usually an ATEM problem — it’s almost always the internet.
Quick fixes:
- Test your internet before every service
- If possible, use a wired network connection
- Lower your stream bitrate slightly
Learn more here:
This gives volunteers a predictable pre-service checklist.
Setting up an ATEM Mini for your church doesn’t have to be stressful or technical. With a simple layout, clear labeling, dependable audio routing, and a steady weekly workflow, your team can create a livestream that feels smooth, consistent, and welcoming for everyone watching. The most important part isn’t mastering every feature — it’s giving your volunteers a clear path, a calm environment, and the confidence to know they can run the system without fear of messing up. Over time, as your team grows more comfortable, your livestream will naturally become more polished. But even on day one, with the basics in place, your church can deliver a meaningful, distraction-free online worship experience every single Sunday.
This post may contain affiliate links. As an Amazon Associate, I earn from qualifying purchases.