Building Your First Church Livestream Setup
Small churches and church plants often want a livestream that looks professional—but without spending thousands or overwhelming volunteers. This guide walks you through the best church livestream setup for around $1,000, built around the Panasonic G7 and Blackmagic ATEM Mini Pro, two of the most reliable and budget-friendly tools available today.
This system delivers crisp video, simplified weekly operation, and a clear upgrade path as your church grows.
What’s Included in This $1,000 System
- Blackmagic ATEM Mini Pro
- 1× Panasonic G7 Mirrorless Camera + 14–42mm Lens Kit
- 1× HDMI Cable (15 ft)
- 1× Lightweight Tripod
- 1× XLR-to-3.5mm TRS Cable (for connecting your church’s existing audio mixer to the ATEM Mini Pro)
What Each Piece of Gear Does
Blackmagic
ATEM Mini Pro
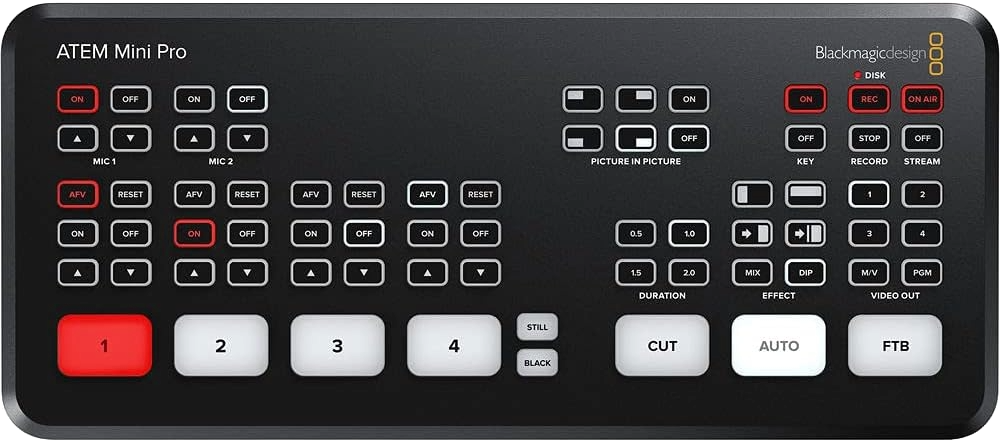
This all-in-one switcher and hardware encoder lets you stream directly to YouTube, Facebook, or your chosen platform without using a computer. It handles your camera signal, audio mix, and encoding, which greatly simplifies Sunday morning workflow for volunteers. Built-in multiview also gives you confidence monitoring.
Panasonic G7
+ 14–42mm Lens Kit
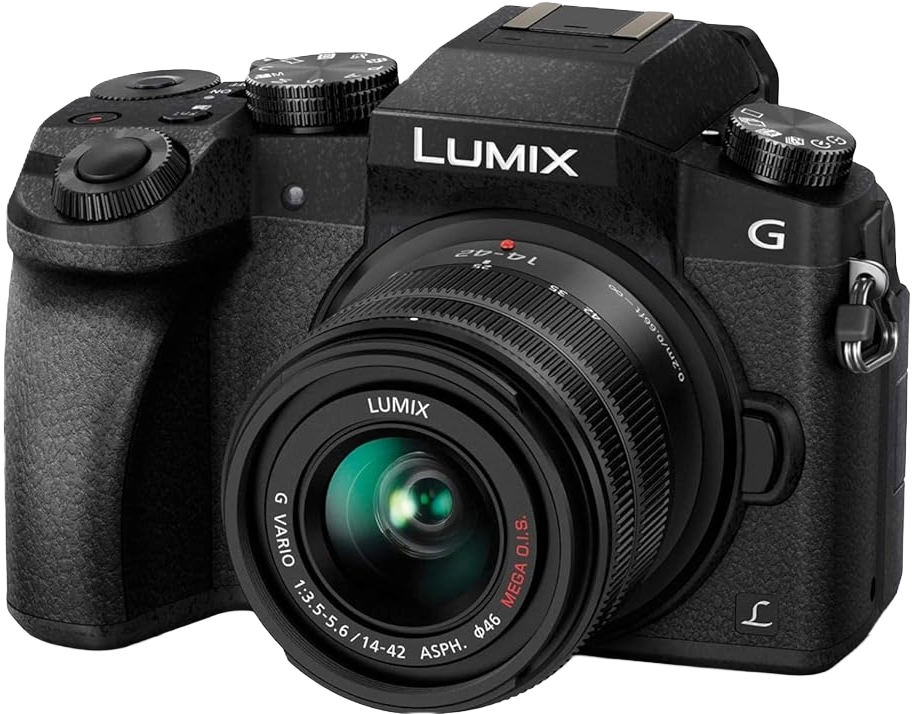
The G7 provides clean, sharp, professional-looking video even in modest church lighting. The 14–42mm lens gives you flexibility for both close-up sermon framing and wider sanctuary shots. This combination consistently outperforms webcams and consumer camcorders at this price point.
HDMI Cable (15 ft)

This connects your camera to the ATEM Mini Pro. A longer cable gives you flexibility to position the camera where it best captures your stage or pulpit.
VICTIV 74”
Camera Tripod
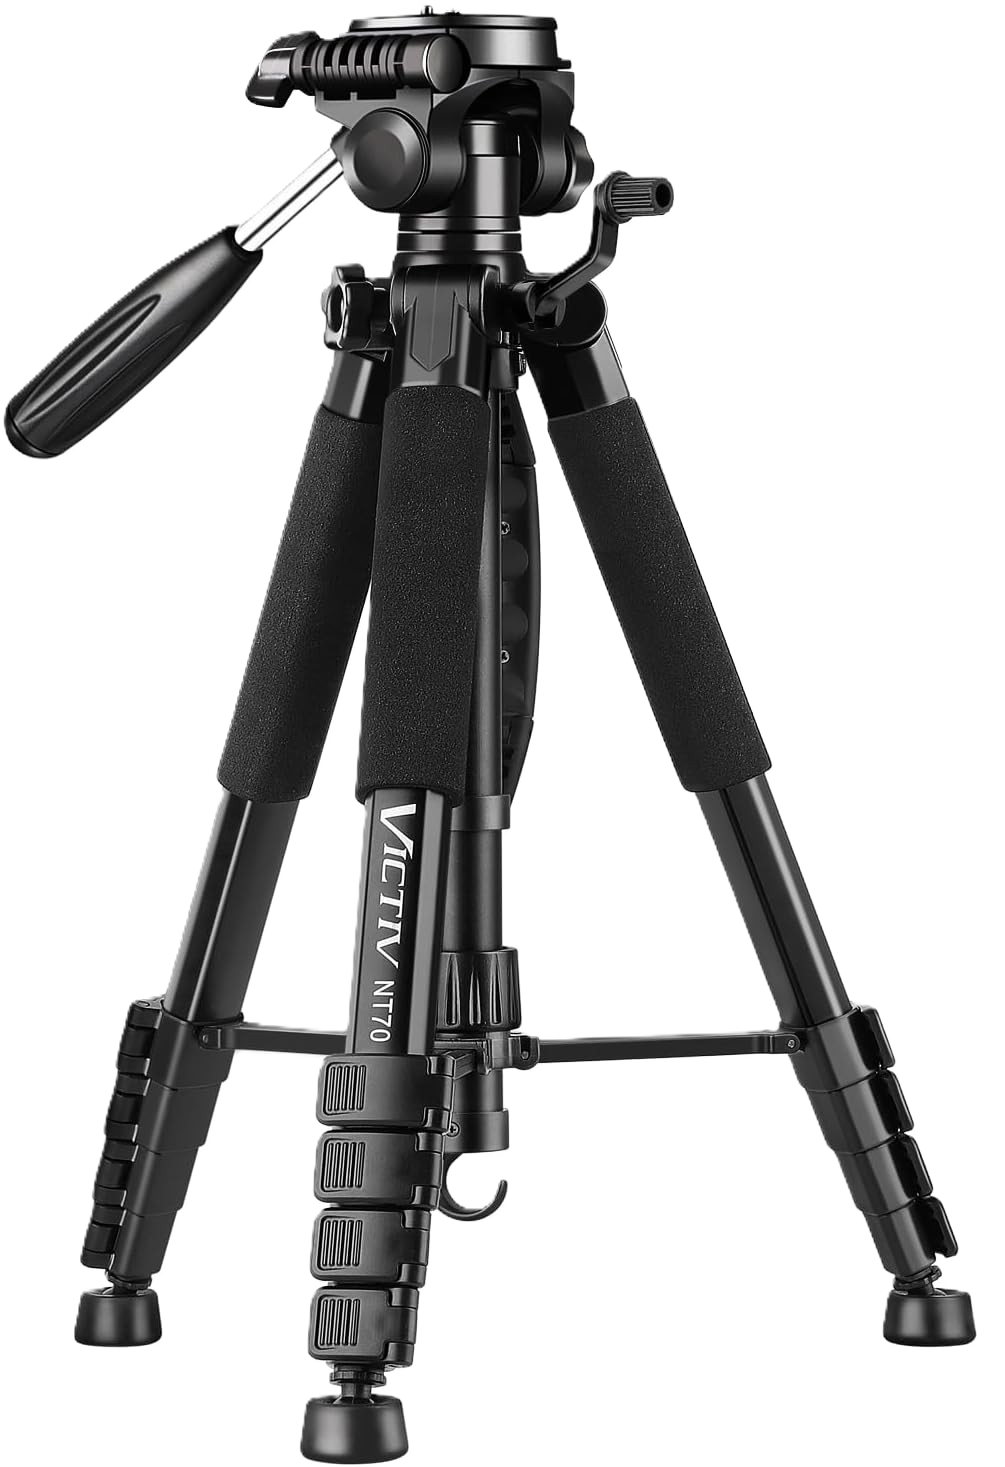
A tripod keeps your camera steady and properly framed. Even an inexpensive tripod makes weekly setup and teardown fast and consistent for volunteers.
XLR to 3.5mm Cable 3.3ft
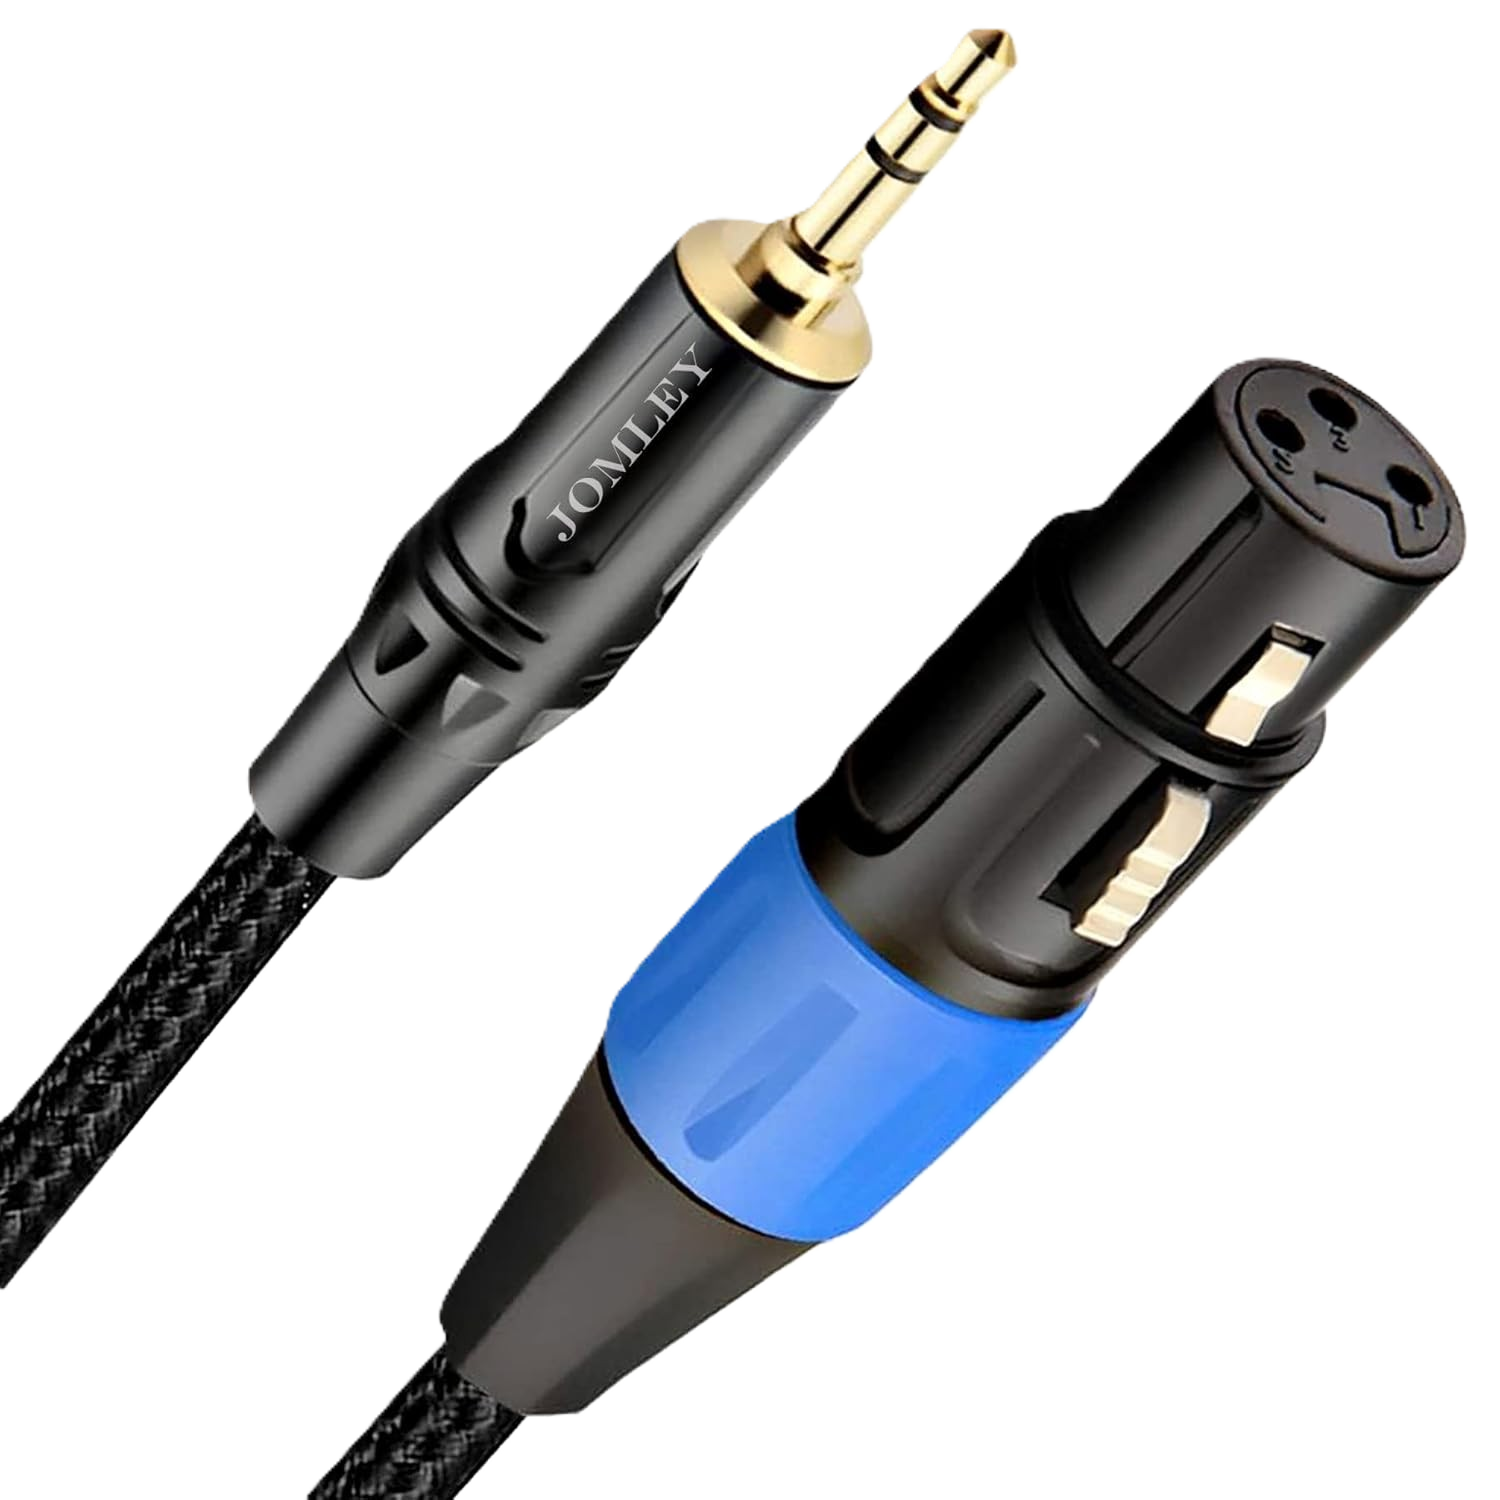
This cable takes audio from your church’s existing mixer and sends it into the ATEM Mini Pro’s Mic 1 input. This allows you to use your current microphones and audio system without needing any extra gear.
Why This Package Works
1. Professional image quality on a small-church budget
The G7’s Micro Four Thirds sensor produces a noticeably cleaner image than webcams or handycams, especially in dimmer worship environments.
2. ATEM Mini Pro handles streaming directly
Built-in streaming eliminates the need for a laptop and reduces technical points of failure. Volunteers simply press “On Air” to start streaming.
3. Uses your church’s existing audio system
No need for extra microphones or USB interfaces. This keeps the setup cost-effective and matches the workflow your audio team already knows.
4. Portable and lightweight
Perfect for portable churches, shared spaces, and sanctuaries where gear must be set up and torn down weekly.
5. Easily scalable
Add additional cameras, lenses, or transition to SDI infrastructure later. This system is a reliable foundation—not a dead-end.
Who This Package Is For (and Not For)
Ideal For:
- Small churches (50–200 people)
- Church plants and rented facilities
- Volunteer-led ministries
- Churches wanting a simple, reliable livestream solution
- Churches already using an audio mixer
Not Ideal For:
- Large sanctuaries needing multi-camera angles
- Churches requiring advanced graphics or video automation
- Rooms needing long SDI cable runs
- Churches wanting PTZ or fully remote camera control
If your church falls into these categories, the upgrade path below gives you clear next steps.
How to Set Up the System (Volunteer-Friendly Steps)
1. Prepare the camera
- Mount the Panasonic G7 on the tripod.
- Position it 15–25 feet from the speaker or pulpit.
- Set to 1080p at either 24fps or 30fps.
- Enable continuous autofocus.
- Use a dummy battery or AC power adapter for long services.
2. Connect the video
- Plug the HDMI cable from the G7 into HDMI 1 on the ATEM Mini Pro.
3. Connect your existing audio system
- Locate a post-fader Aux Out, Monitor Out, or Main Out on your mixer.
- Run an XLR cable from that output into the XLR-to-3.5mm TRS cable.
- Plug the 3.5mm end into Mic 1 on the ATEM Mini Pro.
- Adjust gain using the ATEM’s front-panel controls or Software Control if needed.
4. Streaming from the ATEM Mini Pro
- Connect the ATEM Mini Pro to your router via Ethernet.
- Open ATEM Software Control on any computer on the network (optional, but helpful).
- Enter your YouTube/Facebook/RTMP streaming key.
- Press ON AIR to start your stream.
No external laptop for encoding is required.
Sunday-Morning Volunteer Checklist
Before Service
- Turn on the camera and confirm HDMI output
- Ensure the ATEM Mini Pro is connected to the internet
- Check audio levels coming from the mixer
- Clean the camera lens
- Do a 10-second test stream or recording
- Frame and focus the shot
During Service
- Monitor the multiview on the ATEM (if using)
- Watch audio meters for clipping
- Press ON AIR 2–3 minutes before service begins
After Service
- Press OFF AIR
- Power down the camera and ATEM
- Coil cables neatly
- Pack gear consistently each week
Recommended Upgrade Path
Upgrade 1: Add a second camera
More angles instantly improve engagement.
Upgrade 2: ATEM Mini Extreme (if you grow)
More inputs, more advanced multiview, better monitoring.
Upgrade 3: Improve audio routing
Use a dedicated aux mix for livestream audio to improve clarity.
Upgrade 4: Add lighting
A single LED panel can dramatically improve image quality.
Upgrade 5: Move to SDI infrastructure
Ideal for long runs, balcony positions, or large sanctuaries.
Final Thoughts
This setup delivers the best value in the $1,000 budget category: sharp image quality, simple operation, and seamless integration with your church’s existing audio system. It’s designed for real volunteers, real small churches, and real Sunday mornings, giving your team a dependable livestream foundation that can grow with your ministry.
Check out our related posts:
- Best Church Livestream Setup for $5,000 (Complete Guide)
- ATEM Mini for Churches: Complete 2025 Setup Guide
This post may contain affiliate links. As an Amazon Associate, I earn from qualifying purchases.